Espalier – part ii
Step-by-step guidance on starting and training espalier fruit trees for home gardens.
- By Patricia Hanbidge
August 21, 2025
key points from this story:
- Various espalier styles described in detail
- T-shape and fan suited to different fruits
- Heavy wire needed for support framework
- Tree type and size impact initial setup
- Prune and tie form the espalier pattern
- Ongoing pruning keeps trees productive
Espalier is a unique and satisfying way to grow fruit trees in a small space. The article published last week introduced espalier while this week we get down to the business of how to.
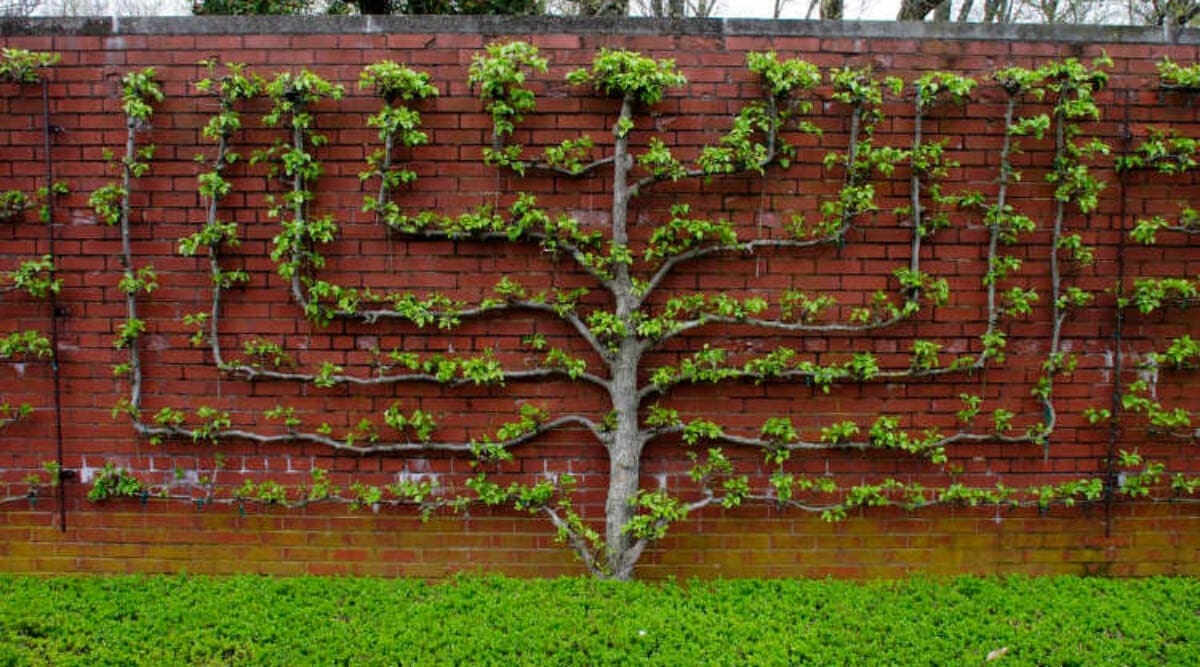
There are many styles of espalier - the T-shape, the cordon, the diamond motif, the basket weave and the fan. The T-shape has a strong centre stem with a series of cross arms and is rather formal in design. This is a great design for apple trees bear fruit on long-lived spurs. Both the cordon and fan are more or less fan-like in appearance with the cordon displaying distinct similarities to a Jewish menorah. Fan-like shapes are best for plums and cherries as they bear fruit on shoots produced in the previous year. Renewal pruning is necessary for consistent fruit production. Regardless of the style you choose, draw it out on graph paper to help you to design the necessary support framework.
Once you have chosen the tree of choice, the framework will need to be created. Heavy wire (12 or 15 gauge) is the traditional support which will need to be supported by the wall or fence. The first wire should be at least a couple of feet (.5m) above the ground and can be followed with upper wires a similar distance apart. Traditionally, three wires are used but more levels are completely acceptable. It is easiest to use a whip to espalier but many gardeners I know would rather start with a larger tree. If your choice is to use a larger tree, choose one that will fit your framework with branches that are evenly spaced. Plant the tree about 6 inches in front of the frame paying attention that the graft union is a couple inches above the soil level.
For larger trees, it is necessary to gradually tease the branches into the desired framework. It is amazing how flexible branches are in spring and how they lend themselves to a less natural position. Waiting to entice larger, woody branches is a lot more work. Branches that do not fit the design are simply removed.
If you are beginning your apple espalier with a whip, then in early spring snip the stem at the height of the first wire. Ensure there are at least three buds below the cut that over the first season will develop into shoots. Tie these new shoots to the lowest wire leaving one shoot vertical. Next spring, prune this vertical to the height of the second wire and follow the same process. This prune and tie system forms the espalier pattern. It is best during this establishment time to prune off any fruit buds so the tree spends all its energy on vegetative growth. Once your espalier form is set, then pruning is simplified but necessary in order to keep the form. Apples simply need to be kept in check but plums and cherries will need to have new branches trained into position each spring in order for fruit to be produced. Those branches that fruited the previous year are simply removed.
Espalier is not difficult and is attractive and satisfying. Perhaps this spring is the time to try your hand at it!
Last Mountain Times Newsletter
Join the newsletter to receive the latest updates in your inbox.


